# Connect Wix using Generic Webhook

Now, let's move on to something exciting – connecting your WIX Account using Generic Webhooks!

### Generating Webhook URL in your Gallabox Account

1. Go to your Gallabox Dashboard and navigate to **Integration** on the left pane. Under Integration, you can find **Generic Webhook**.&#x20;

<figure><img src="https://3137140735-files.gitbook.io/~/files/v0/b/gitbook-x-prod.appspot.com/o/spaces%2FZcl3T6ePz95GpzjAeOLW%2Fuploads%2FgCjZevyB3FqpBGcVspyA%2FGeneric%20Webhook%20Integration%20in%20Gallabox.gif?alt=media&#x26;token=4b39bfe4-0b54-465b-8003-c3ae228e7065" alt=""><figcaption><p>Gallabox Integrations</p></figcaption></figure>

2. Click on it and provide a name to the Integration “**Wix Integration**” for example.&#x20;

<figure><img src="https://3137140735-files.gitbook.io/~/files/v0/b/gitbook-x-prod.appspot.com/o/spaces%2FZcl3T6ePz95GpzjAeOLW%2Fuploads%2FB9DWbZKp4sByJFCm2bh8%2FWix%20Connection.gif?alt=media&#x26;token=a622abf2-03c1-4eef-9a4a-1c357ff66094" alt=""><figcaption><p>Wix Integration in Gallabox</p></figcaption></figure>

3. Select the Channel you want to use with WIX. The Webhook URL will be there to be used in the further steps.

<figure><img src="https://3137140735-files.gitbook.io/~/files/v0/b/gitbook-x-prod.appspot.com/o/spaces%2FZcl3T6ePz95GpzjAeOLW%2Fuploads%2F6UNQe5qSPd96VAUdk2Zy%2FWix%20Integration%20channel%20selection.gif?alt=media&#x26;token=010f3f9f-78c8-42a4-8bc5-a199e0933e54" alt=""><figcaption></figcaption></figure>

### Adding Webhook URL in your WIX Account

1. Go to your WIX Account. In the left hand side navigation bar, navigate to **Automations**. Click on the button **New Automation** as shown in the below screenshot. A pop-up will appear.

<figure><img src="https://3137140735-files.gitbook.io/~/files/v0/b/gitbook-x-prod.appspot.com/o/spaces%2FZcl3T6ePz95GpzjAeOLW%2Fuploads%2FMEIk01lQy4jQIgI2WX6p%2FAutomation%20in%20WIX.gif?alt=media&#x26;token=29a7ae07-dd5b-43b2-bc98-5e8c4f4427fc" alt=""><figcaption><p>WIX Dashboard</p></figcaption></figure>

2. To create an automation, click on **Set up** for the automation from any of the categories among the 5 available. Let’s go with “**Thank visitors who submit a form**” automation for better clarity.&#x20;

<figure><img src="https://3137140735-files.gitbook.io/~/files/v0/b/gitbook-x-prod.appspot.com/o/spaces%2FZcl3T6ePz95GpzjAeOLW%2Fuploads%2F3g2QtaJLICdv092pKqGX%2FAutomation%20in%20Wix.gif?alt=media&#x26;token=3d78e15f-d131-47f8-8faf-5c6533e7567c" alt=""><figcaption><p>Creating new Automation in WIX</p></figcaption></figure>

3. Another Pop-up will show asking you to **Edit the automation**. We have to select the **Action** to respond to the **trigger**, you have to click on Edit and select “**Send via Webhook**”  as shown in the below screenshot. In the Target URL, you have to paste the Webhook URL that was generated in **Step-01** (**Gallabox Webhook URL**) and select “**All Keys and Values**”.&#x20;

   Click on **Activate**.&#x20;

<figure><img src="https://3137140735-files.gitbook.io/~/files/v0/b/gitbook-x-prod.appspot.com/o/spaces%2FZcl3T6ePz95GpzjAeOLW%2Fuploads%2FYEYht55C2ZIS9h5eHwRX%2FAutomation.gif?alt=media&#x26;token=62251513-30ad-4cb0-b1f0-e2a64f4aa085" alt=""><figcaption><p>Editing the automation</p></figcaption></figure>

Your Automation is Ready to be configured in the Gallabox!

### Testing the Webhook in your Gallabox account

1. Go back to Gallabox tab to test if the Automation created is working or not. Click on **Capture Webhook Response** Button as guided in the GIF below.&#x20;

<figure><img src="https://3137140735-files.gitbook.io/~/files/v0/b/gitbook-x-prod.appspot.com/o/spaces%2FZcl3T6ePz95GpzjAeOLW%2Fuploads%2F1d8x4CRVtoU6mSf8hDKS%2FCapture%20response%20in%20Gallabox.gif?alt=media&#x26;token=7d344003-3dba-441b-8fa3-3b1fe48e0ae0" alt=""><figcaption></figcaption></figure>

2. After clicking on the button in Gallabox, go back to the tab where your website is opened and scroll down to the form. Fill out the form with test details in order to capture the response. Once you click on **Submit** button in the above form, the response captured will come on your Gallabox account like  shown in the GIF below. Click on **Update Configuration** Button.&#x20;

*Make sure to check if you have selected the Channel before clicking on **Update Configuration** Button.*&#x20;

<figure><img src="https://3137140735-files.gitbook.io/~/files/v0/b/gitbook-x-prod.appspot.com/o/spaces%2FZcl3T6ePz95GpzjAeOLW%2Fuploads%2FF2N0gleB1N3C3wVXDqe7%2Ffill%20WIX%20form.gif?alt=media&#x26;token=25f4c377-790b-40a9-a0d3-ea532bbf8d92" alt=""><figcaption></figcaption></figure>

{% hint style="info" %}
If your WIX form doesn't have any WhatsApp number, then the WhatsApp Message will not be shared with them.
{% endhint %}

You have connected your Wix Automation with Gallabox. Let's see how to create a workflow in the Gallabox!

### WhatsApp Message Workflow

1. Click on “**Create New Workflow**” and enter the Webhook Name.&#x20;

<figure><img src="https://3137140735-files.gitbook.io/~/files/v0/b/gitbook-x-prod.appspot.com/o/spaces%2FZcl3T6ePz95GpzjAeOLW%2Fuploads%2F3yfDJE7zQqVQr5NJCFZU%2FWorkflow%20name%20-%20Generic%20Webhook.gif?alt=media&#x26;token=194e0525-9a4b-4cba-8fd9-e6e66aff0a1c" alt=""><figcaption><p>
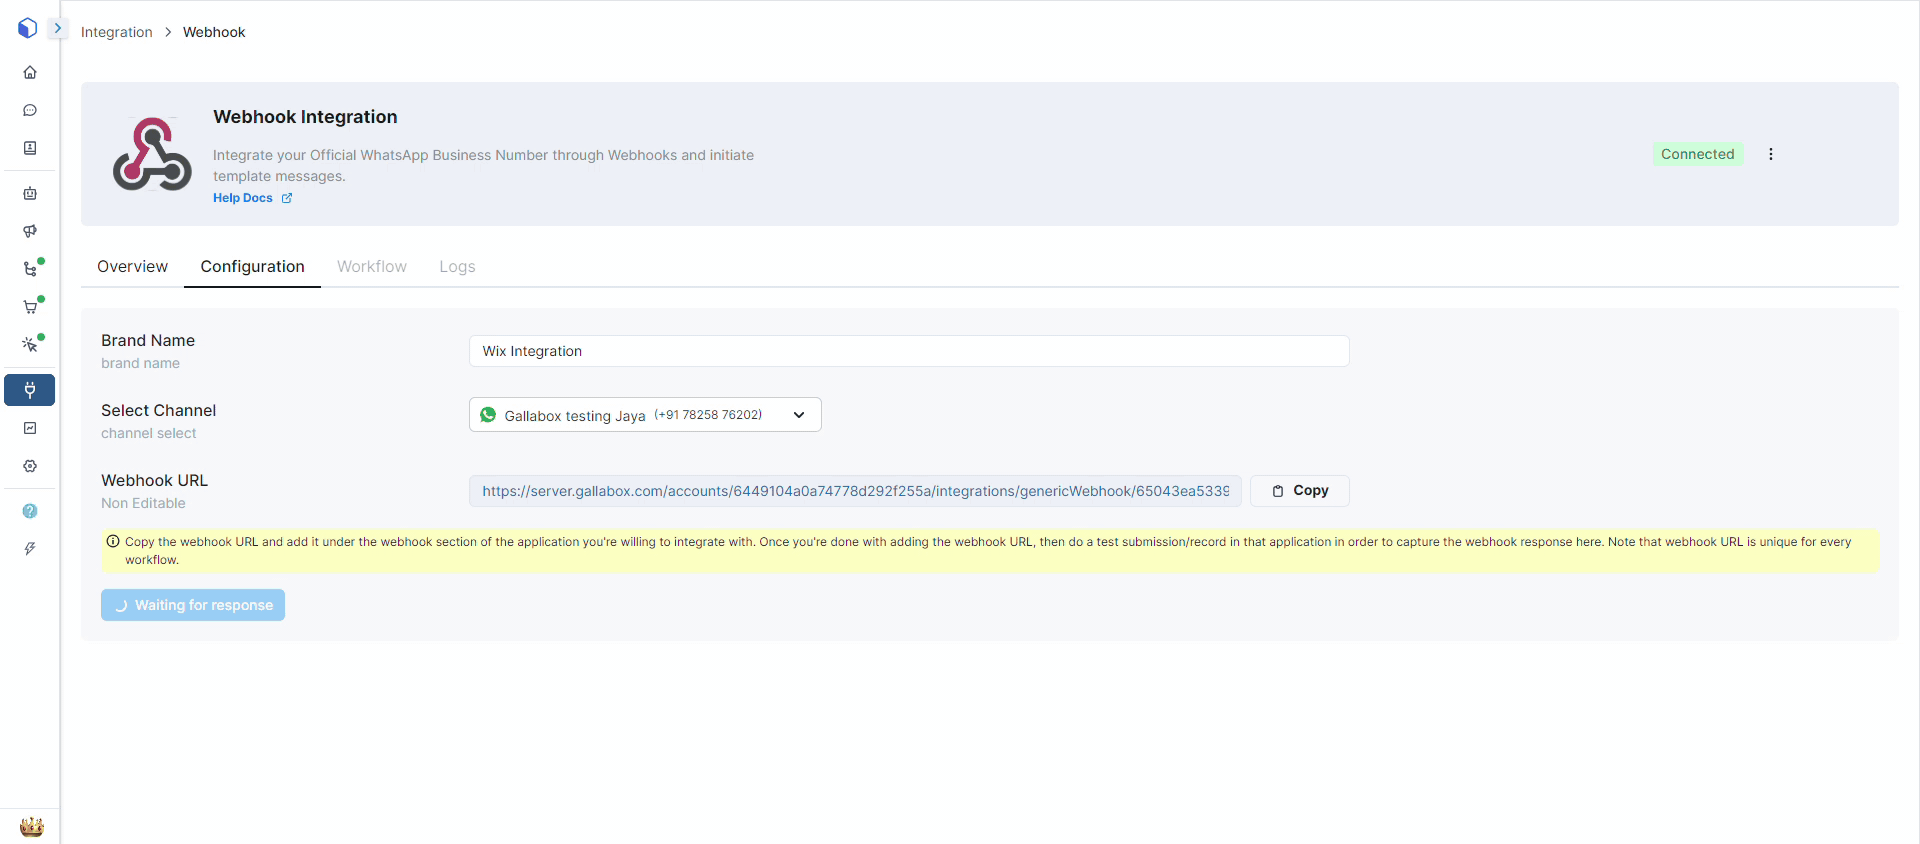
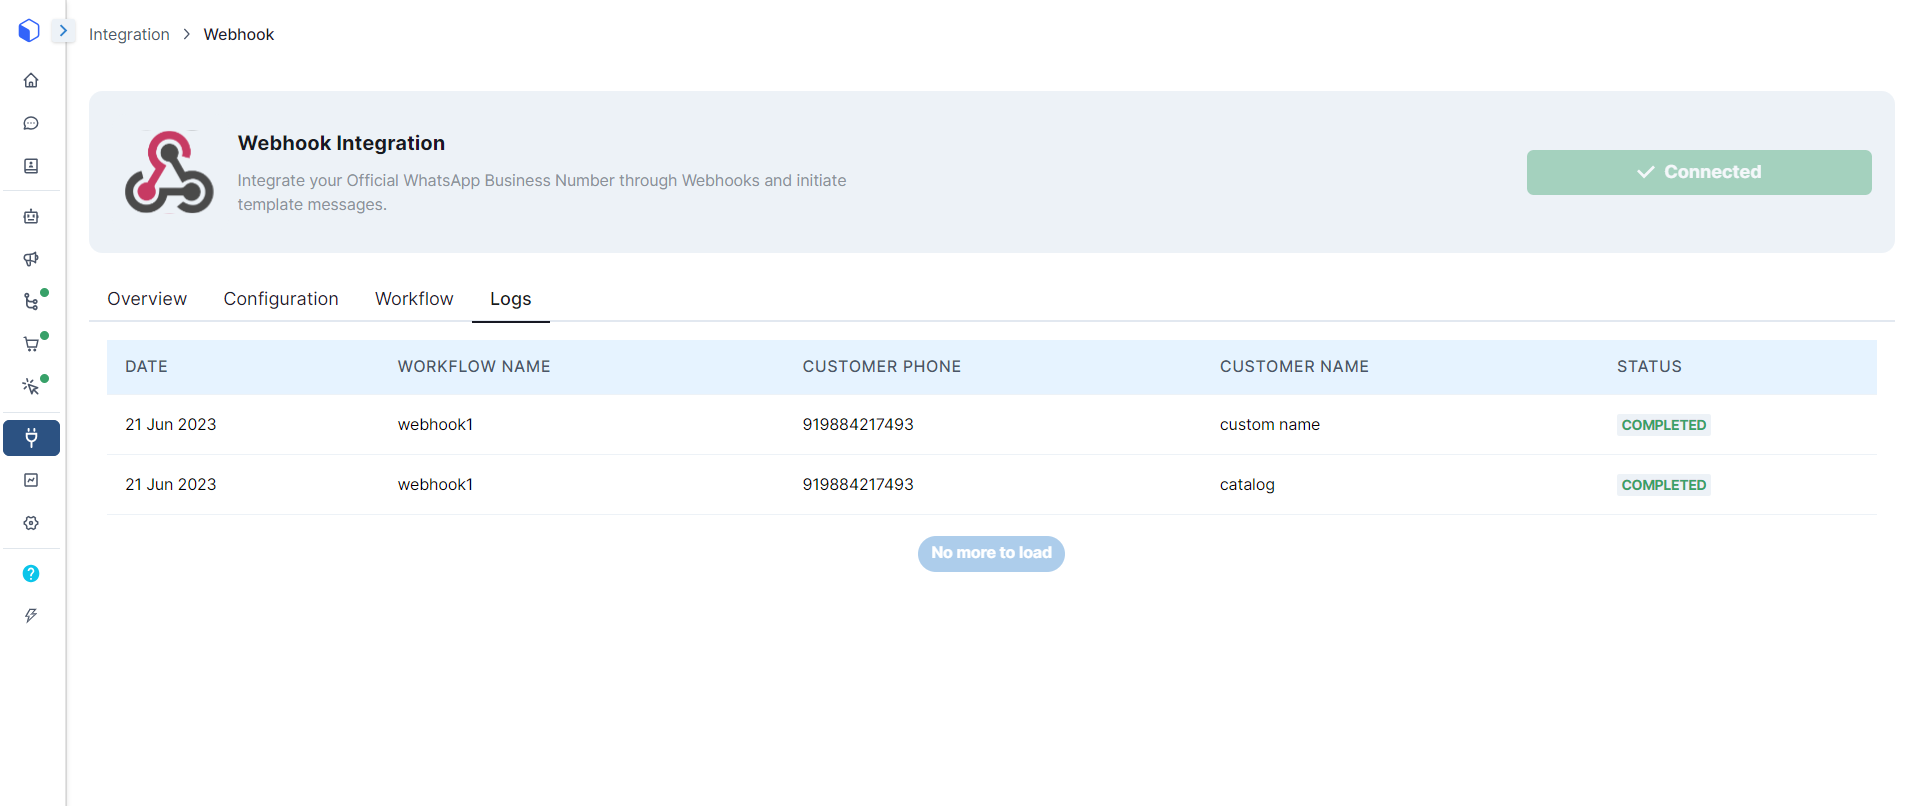
Creating Workflow in Gallabox</p></figcaption></figure>

2. You can edit the Conditions for the workflow, you have to choose from options **ALL** and **ANY**. If you choose **ALL** then if all the conditions are true then the workflow will work. If you choose **ANY** then if the one condition is true then also the workflow will work.&#x20;

<figure><img src="https://3137140735-files.gitbook.io/~/files/v0/b/gitbook-x-prod.appspot.com/o/spaces%2FZcl3T6ePz95GpzjAeOLW%2Fuploads%2FMrXP4ON0sNAqllGcwl61%2FWix_automation_conditions.png?alt=media&#x26;token=bb081027-685f-4242-974f-bdbe8dccf765" alt=""><figcaption></figcaption></figure>

4. If you click on +Add Conditions, you have to add the fields for **Comparator**, **Operator**, and the **value**.&#x20;

<figure><img src="https://3137140735-files.gitbook.io/~/files/v0/b/gitbook-x-prod.appspot.com/o/spaces%2FZcl3T6ePz95GpzjAeOLW%2Fuploads%2FL56AQb46FKwbHJ4kNM7H%2Fwix_automation_condition.png?alt=media&#x26;token=10a1c0f5-8645-4b49-a36d-2f75a9f0fd16" alt=""><figcaption></figcaption></figure>

5. To add the comparator, you have to go back to the Configuration under the Generic Webhook Integration and scroll down and see which field has the data that you want to put conditions on. In the below screenshot **`data.contact.name.first`** has the values for the first name, similarly **data.field:comp-ku9urhdy** has the values for the Subject and **`data.field:comp-ku9urhe11`** has the values for the messages that customer wants to send across.&#x20;

{% hint style="info" %}
The values on the left hand side will depend on the fields that you have added in the form on your website.&#x20;
{% endhint %}

<figure><img src="https://3137140735-files.gitbook.io/~/files/v0/b/gitbook-x-prod.appspot.com/o/spaces%2FZcl3T6ePz95GpzjAeOLW%2Fuploads%2FOTHedYi66KiblYIIkbPI%2Fwix_automation_response.png?alt=media&#x26;token=e449a3b8-2118-4a89-b9f0-fe1efad2ebcd" alt=""><figcaption></figcaption></figure>

6. In the below screenshot, we have taken the two conditions - **`data.field:comp-ku9urhdy`** Is Not Empty and **`data.field:comp-ku9urhe11`** Is Not Empty. It means if the customer has added something in the Subject and Description field then the workflow will run and the customer will get the message via Gallabox.

<figure><img src="https://3137140735-files.gitbook.io/~/files/v0/b/gitbook-x-prod.appspot.com/o/spaces%2FZcl3T6ePz95GpzjAeOLW%2Fuploads%2FWln5EOSmwBvy0MK1kUoq%2Fwix_automation_condition_.png?alt=media&#x26;token=3899eab2-19ba-4a14-9701-89140e9e22c4" alt=""><figcaption></figcaption></figure>

7. Click on **Pick Template** and another pop-up will be there asking you to choose from the templates already created and verified from **META**. Once you pick the template that you want to share with your customers, you will have to map the variables. The Recipient name and Recipient Number are the details that you want to use to create the contact in Gallabox.

In the message footer, there are two buttons, you have to map the variables for the webpages you want the customer to redirect to.&#x20;

<figure><img src="https://3137140735-files.gitbook.io/~/files/v0/b/gitbook-x-prod.appspot.com/o/spaces%2FZcl3T6ePz95GpzjAeOLW%2Fuploads%2FhDYdCRkDEMcDlkNiYRZ2%2FWix%20Automation%20via%20Webhook%20Step%20%2005.2.png?alt=media&#x26;token=a220e91d-fe0c-4fd2-b324-7d2d1554be19" alt=""><figcaption><p>Mapping the variables in the custom template chosen</p></figcaption></figure>

{% hint style="info" %}
*Please note that the variables will depend on the type of message template you have created.*&#x20;
{% endhint %}

8. If you want to [<mark style="color:blue;">**trigger a sequence**</mark>](https://docs.gallabox.com/~/changes/A8xmww5XU9i8x7QbfPLe/integration/other-integrations/generic-webhooks/broken-reference) from Gallabox or update the contact details, Click on “**Action**”. Edit the “**Action Type**” as "**Update Contact**" Tags. Click on the **Contact Tag** that you have used to trigger a sequence in Gallabox.&#x20;

For your reference, we have taken the Contact Tag as “**`Imp4380`**” and we have chosen the operation as “**Add if Empty**”.

Click on “**Create Workflow**” as a Final Step in the Integration.&#x20;

<figure><img src="https://3137140735-files.gitbook.io/~/files/v0/b/gitbook-x-prod.appspot.com/o/spaces%2FZcl3T6ePz95GpzjAeOLW%2Fuploads%2Fe6ieNO4NgJ8ElCc1pVLJ%2FWix%20Automation%20via%20Webhook%20Step%2005.3.png?alt=media&#x26;token=d2771127-e3ab-49ea-abb1-64e473ae3174" alt=""><figcaption><p>
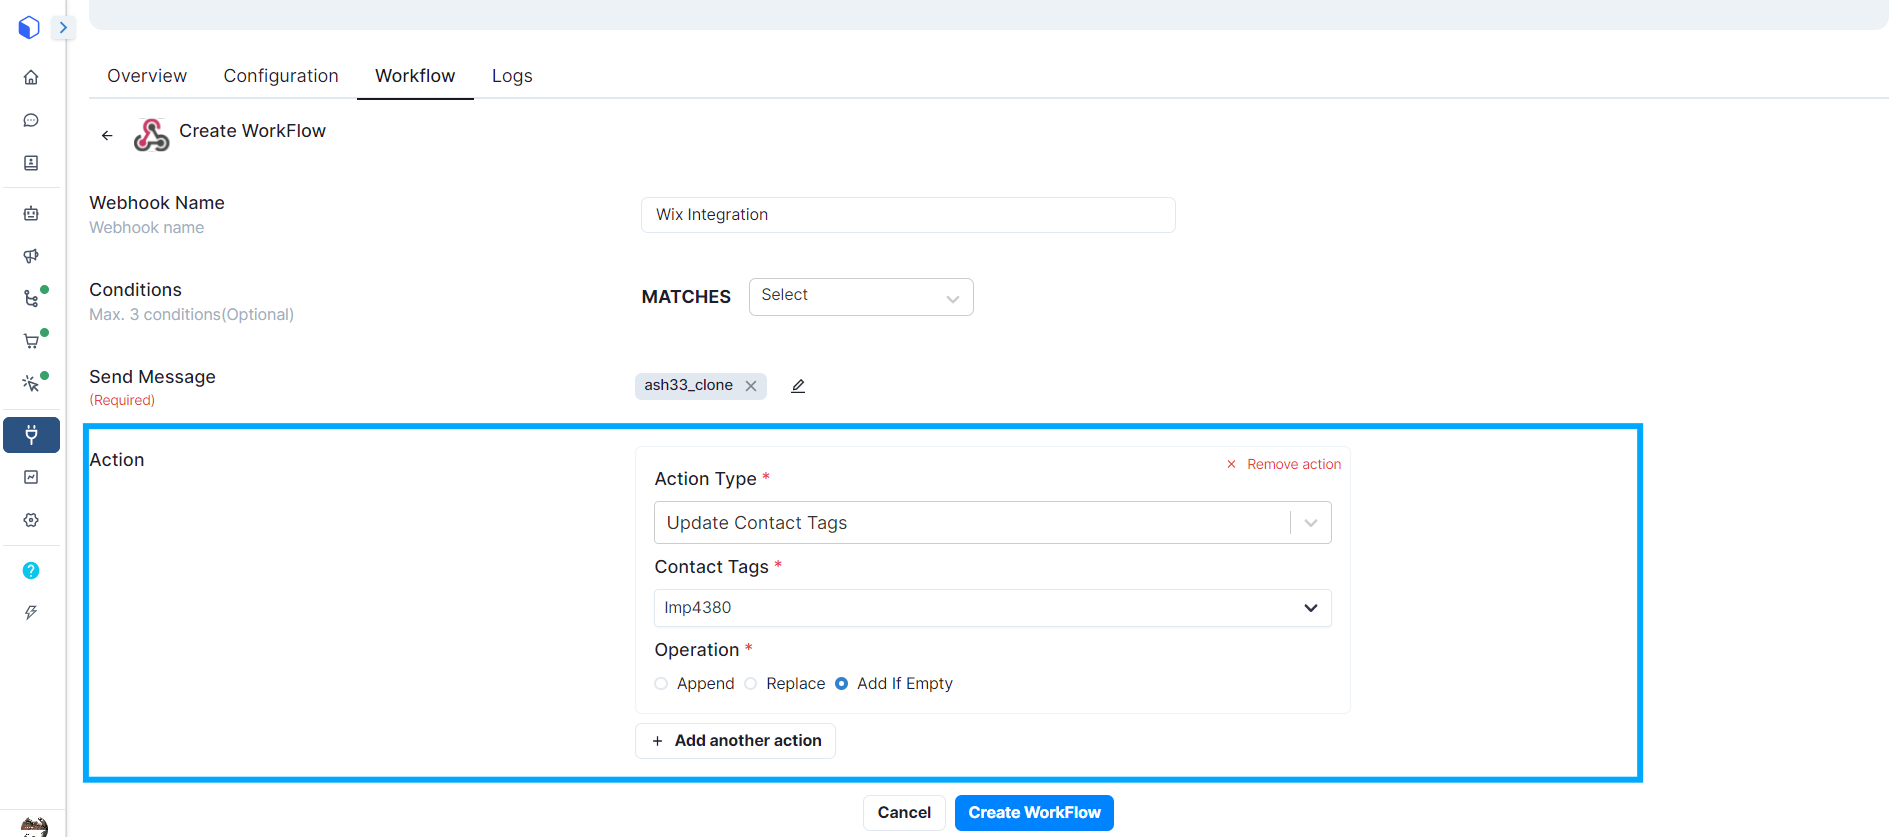
Editing the Action in the Workflow</p></figcaption></figure>

9. After the Integration is successful, you can see who all have received the messages via logs under the Generic Webhook Integration.

<figure><img src="https://3137140735-files.gitbook.io/~/files/v0/b/gitbook-x-prod.appspot.com/o/spaces%2FZcl3T6ePz95GpzjAeOLW%2Fuploads%2FdD45b5nhyQpIWuPBQCvA%2Fimage.png?alt=media&#x26;token=a9076aa1-7f1c-476a-a27e-b9791d5304c8" alt=""><figcaption></figcaption></figure>
