# Workflows for HubSpot

In this article, we delve into creating efficient workflows within HubSpot, highlighting how these can streamline your business processes. Explore step-by-step instructions on setting up and automating tasks to enhance your operations.

## Send WhatsApp Message

1. From the top navigation bar, hover on Automation and select workflow. To start creating the Workflow, click on Create Workflow and click on either **From Scratch** or **From template**.  We will select **From Scratch** to guide you through.&#x20;

<figure><img src="https://3137140735-files.gitbook.io/~/files/v0/b/gitbook-x-prod.appspot.com/o/spaces%2FZcl3T6ePz95GpzjAeOLW%2Fuploads%2FAOSQaj1wHB2kupy99CUx%2FCreate%20Workflow%20from%20Scratch..gif?alt=media&#x26;token=0c601609-6806-4def-83f7-62ee760587df" alt=""><figcaption><p>Workflow in HubSpot</p></figcaption></figure>

2. You have to choose the trigger and how you want to start the workflow. For your understanding, we will choose the trigger - **Contact-based** and with a **Blank Workflow**. You can explore and choose the trigger and the way you want to start the workflow. Click on **Next**.

<figure><img src="https://3137140735-files.gitbook.io/~/files/v0/b/gitbook-x-prod.appspot.com/o/spaces%2FZcl3T6ePz95GpzjAeOLW%2Fuploads%2F6x0smNANWiHZIByMv13M%2FChoose%20the%20Trigger.gif?alt=media&#x26;token=1012f912-4bc1-4eff-be24-f0fb80e37269" alt=""><figcaption><p>Choosing the trigger</p></figcaption></figure>

3. Click on **Set up the trigger** to decide how the contact will enter the workflow we are creating. When you click on the button - Set up Triggers, a left pop-up will come for the Enrollment triggers. To know in depth about how to set up trigger, click [here](https://knowledge.hubspot.com/workflows/set-your-workflow-enrollment-triggers?KBOpenTab).

<figure><img src="https://3137140735-files.gitbook.io/~/files/v0/b/gitbook-x-prod.appspot.com/o/spaces%2FZcl3T6ePz95GpzjAeOLW%2Fuploads%2Fp2PENv3ehJw8tXTgeNbG%2FChoose%20the%20event%20for%20Trigger.gif?alt=media&#x26;token=b158dc34-4ddd-4cab-908b-030f3aa797ac" alt=""><figcaption><p>Trigger in the Workflow</p></figcaption></figure>

4. Click on **+** to choose the action available. Under the listed Actions, scroll to the bottom to **WhatsApp Business Messaging** and select from the lis&#x74;**.**  We will select Gallabox **Send WhatsApp Messager (Advanced**) as an example.&#x20;

<figure><img src="https://3137140735-files.gitbook.io/~/files/v0/b/gitbook-x-prod.appspot.com/o/spaces%2FZcl3T6ePz95GpzjAeOLW%2Fuploads%2F4TW6pcSfB7OrUkJ3NX1m%2FAdding%20the%20Action.gif?alt=media&#x26;token=e9d92cd2-ebe0-4808-b080-7488d46a1dbd" alt=""><figcaption></figcaption></figure>

5. After you select, you will have to paste certain values in order to successfully create the action item. For every template, you will have to add the following details:

   I. Gallabox Account id

   II. Gallabox API key & secret

   III. WhatsApp number

   IV. Select WhatsApp template

   V. Variable, button, and payload values, if required

<figure><img src="https://3137140735-files.gitbook.io/~/files/v0/b/gitbook-x-prod.appspot.com/o/spaces%2FZcl3T6ePz95GpzjAeOLW%2Fuploads%2F2vnCZfamexpuCaooHpMY%2FHubSpot%20%2B%20Gallabox%20_%20HubSpot%20(1).png?alt=media&#x26;token=bc77d82a-958a-45f3-a263-8f5cc6d7d1c6" alt=""><figcaption></figcaption></figure>

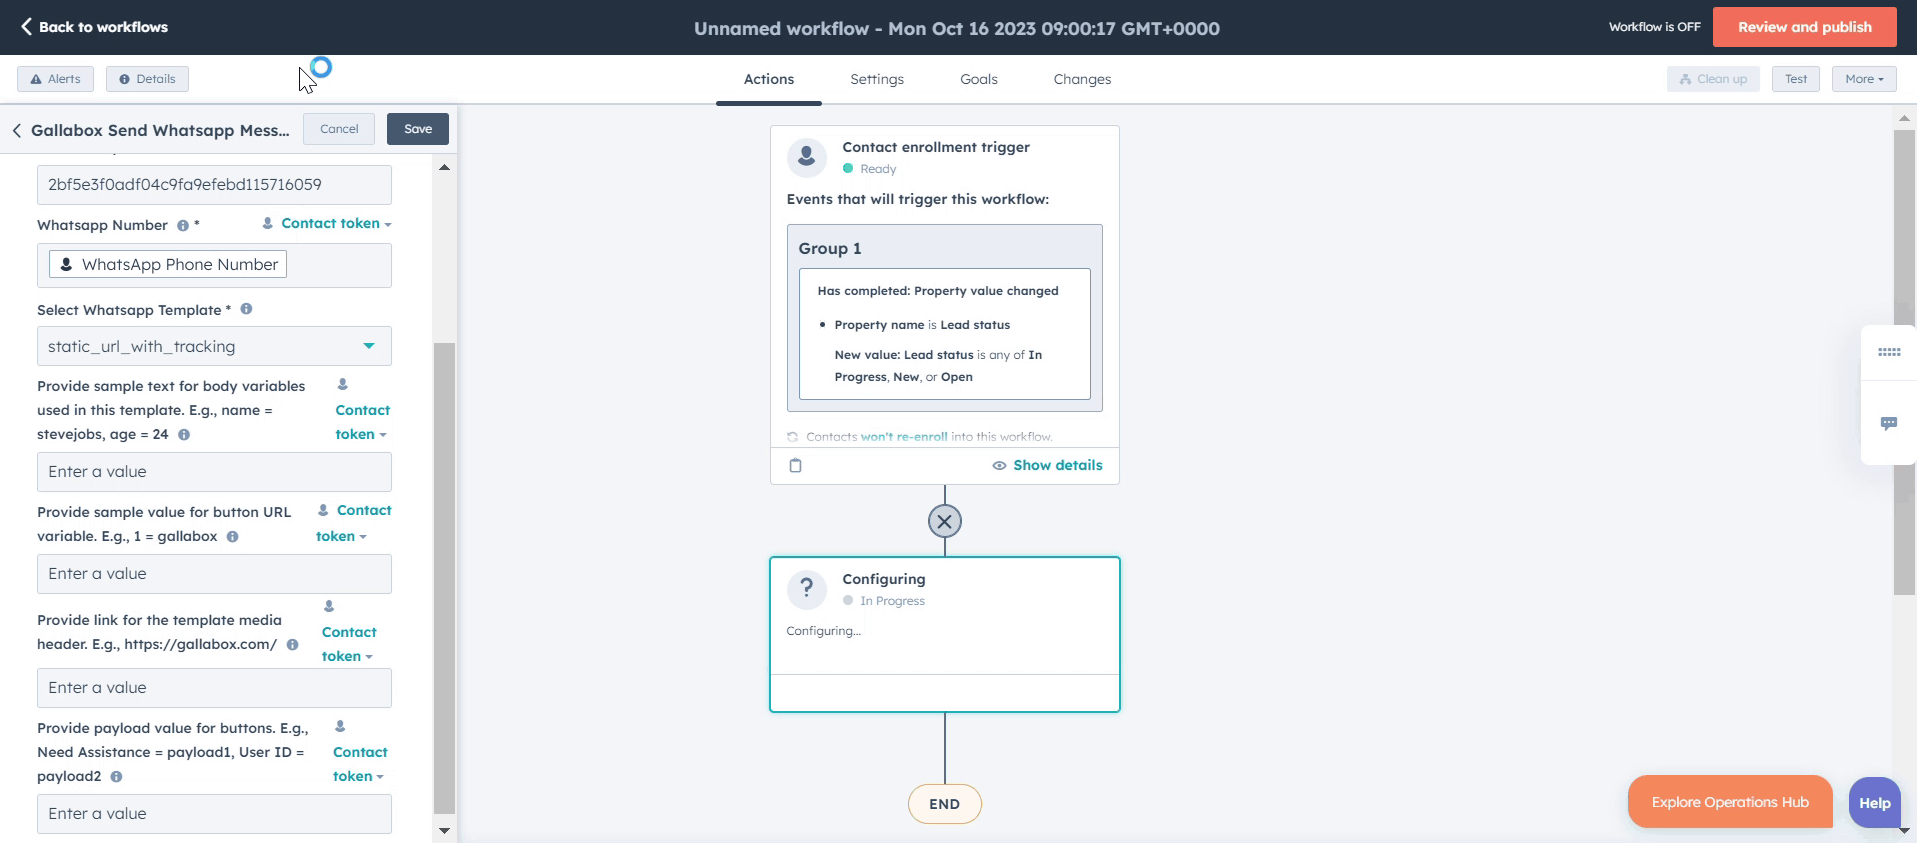
6. Click on your Gallabox **Profile** and select **Account Details. Copy the ID** that is being displayed at the top. Paste the Account Id under **Gallabox Account Id** in HubSpot.&#x20;

<figure><img src="https://3137140735-files.gitbook.io/~/files/v0/b/gitbook-x-prod.appspot.com/o/spaces%2FZcl3T6ePz95GpzjAeOLW%2Fuploads%2FuZiJcuqK2dC0330mt6FQ%2FGallabox%20Account%20Id%20in%20HubSpot.gif?alt=media&#x26;token=2d2d1df6-751e-4ffa-922d-ddcad60b2876" alt=""><figcaption></figcaption></figure>

7. Click on **Settings** to Select the **API keys** and copy paste the API Key and API Secret.

{% hint style="info" %}
[Detailed read](https://docs.gallabox.com/~/changes/A8xmww5XU9i8x7QbfPLe/integration/customer-relationship-management-crm-systems/hubspot/broken-reference) if you haven't created any API Keys.&#x20;
{% endhint %}

<figure><img src="https://3137140735-files.gitbook.io/~/files/v0/b/gitbook-x-prod.appspot.com/o/spaces%2FZcl3T6ePz95GpzjAeOLW%2Fuploads%2Fs0dN5SRkeqNEWTKqcsSE%2FAPI%20Key%20and%20Secret%20for%20HubSpot.gif?alt=media&#x26;token=b616e904-8df7-41f9-aa6c-d226f29a2044" alt=""><figcaption></figcaption></figure>

8. Input the number you want to send the message to. Click on **Contact Token** and Search and select the column names shown in the picture below. For type choose **Contact** from the list and for Token select **WhatsApp Phone Number**.&#x20;

<figure><img src="https://3137140735-files.gitbook.io/~/files/v0/b/gitbook-x-prod.appspot.com/o/spaces%2FZcl3T6ePz95GpzjAeOLW%2Fuploads%2FCypbpLCqhbEYgwq6Ulzn%2FWhatsAPP%20Number%20in%20Hubspot.gif?alt=media&#x26;token=2d2d876c-dd4b-4e41-8f45-04ebc91cfe26" alt=""><figcaption></figcaption></figure>

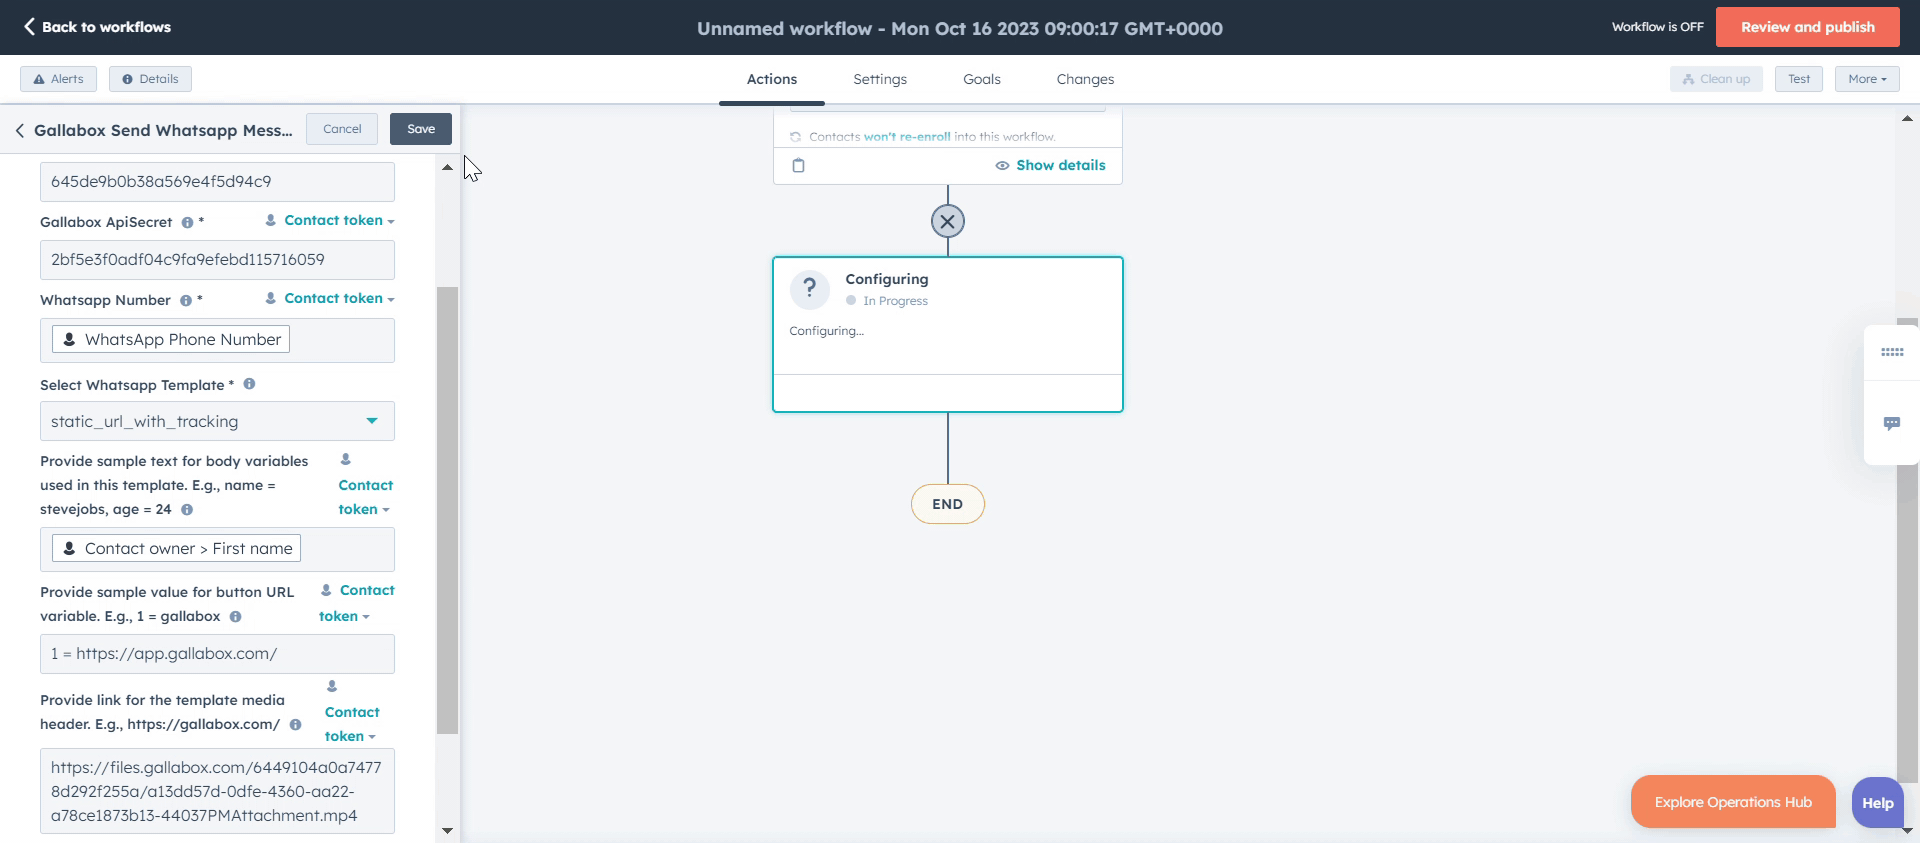
9. All the verified templates in the Gallabox Account will be listed here. Select the desired WhatsApp template from the list. For example we have taken the WhatsApp Template - `static_url_with_tracking`.&#x20;

<figure><img src="https://3137140735-files.gitbook.io/~/files/v0/b/gitbook-x-prod.appspot.com/o/spaces%2FZcl3T6ePz95GpzjAeOLW%2Fuploads%2FccnLYLetECmwFE4mKsBZ%2FSelect%20Whatsapp%20template%20-%20hubspot.gif?alt=media&#x26;token=3b4fd8ca-262c-4e08-a317-1f4bae50b383" alt=""><figcaption></figcaption></figure>

10. If the template you are using supports some variables, buttons, and payload, You can provide those details here like shown in the picture below.&#x20;

{% hint style="info" %}
The best practise is to view the selected template in another browser to verify the variables.&#x20;
{% endhint %}

<figure><img src="https://3137140735-files.gitbook.io/~/files/v0/b/gitbook-x-prod.appspot.com/o/spaces%2FZcl3T6ePz95GpzjAeOLW%2Fuploads%2FbSptc6xpCErHsruf2827%2FBody%20Variables%20in%20Sample%20Text.gif?alt=media&#x26;token=ba76f21b-5c9a-4b9e-8271-cc0f996d18d9" alt=""><figcaption></figcaption></figure>

11. If your template has any button variables, mention them as shown in the picture below. We have added the value for CTA button.&#x20;

<figure><img src="https://3137140735-files.gitbook.io/~/files/v0/b/gitbook-x-prod.appspot.com/o/spaces%2FZcl3T6ePz95GpzjAeOLW%2Fuploads%2FpFiUUd7OkAjvgQhdCzOj%2FSample%20value%20for%20button%20URl.gif?alt=media&#x26;token=244e4dc8-39cd-477d-b06a-3ea5ef3b2d72" alt=""><figcaption></figcaption></figure>

12. If your template has any media header, paste the link in the field as shown.

<figure><img src="https://3137140735-files.gitbook.io/~/files/v0/b/gitbook-x-prod.appspot.com/o/spaces%2FZcl3T6ePz95GpzjAeOLW%2Fuploads%2FGduRxcSW7WxLY96dRcPO%2FHeader%20Link%20URL.gif?alt=media&#x26;token=70d72396-925f-4fa7-9403-f8f5510233a4" alt=""><figcaption></figcaption></figure>

13. Once you have pasted all the information, click on Save button as shown in the picture to save the Action.&#x20;

<figure><img src="https://3137140735-files.gitbook.io/~/files/v0/b/gitbook-x-prod.appspot.com/o/spaces%2FZcl3T6ePz95GpzjAeOLW%2Fuploads%2FTNE5zamtukwUp3wtKll3%2FSave%20the%20Action.gif?alt=media&#x26;token=18d51c4d-5f43-4b1c-b604-0311b1ffe7b2" alt=""><figcaption></figcaption></figure>

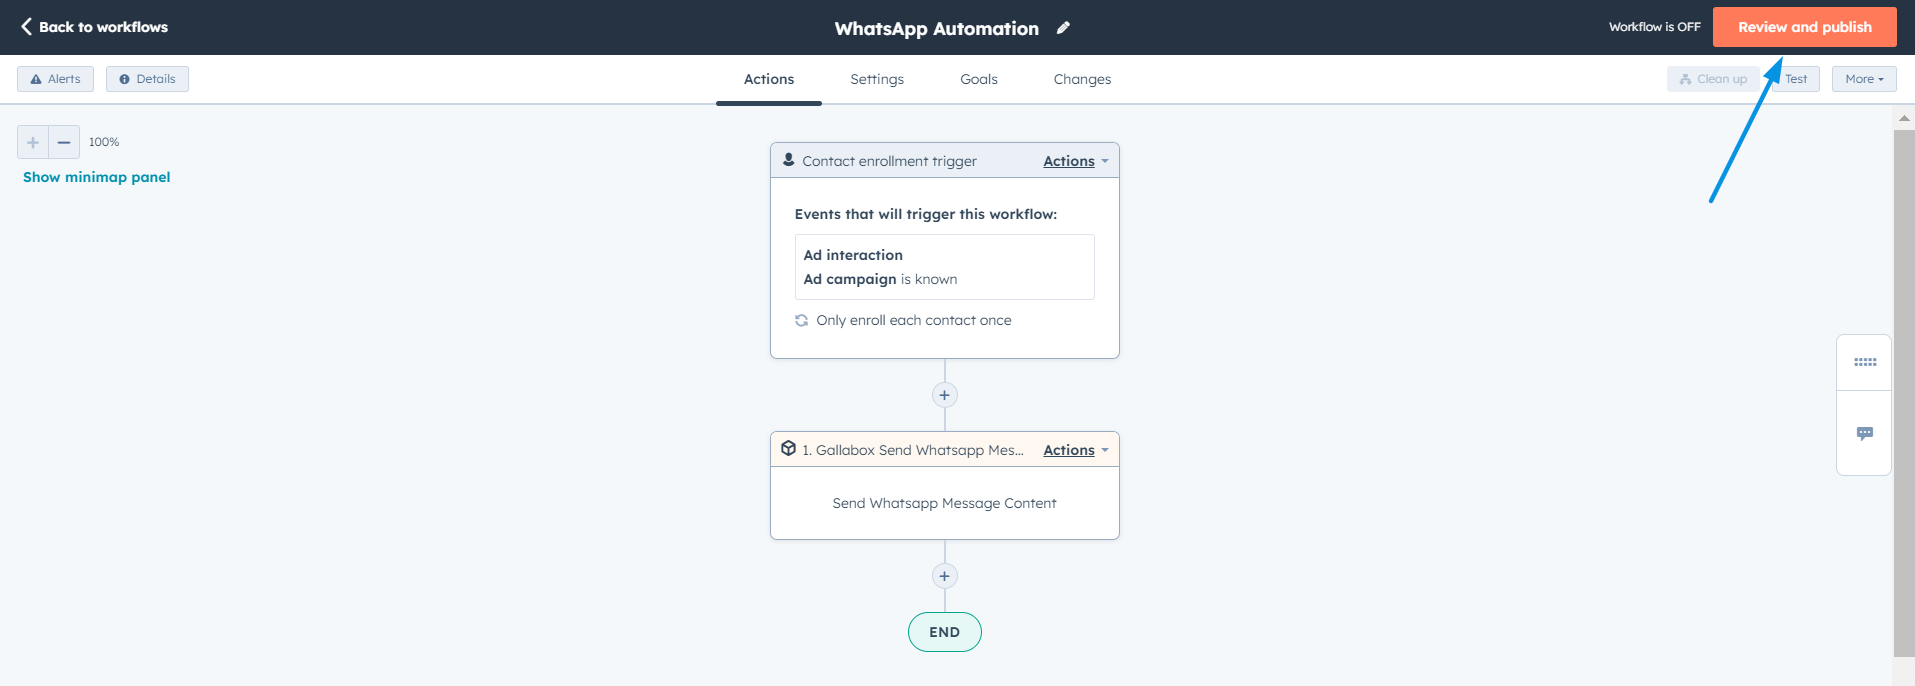
14. Once you save the action, procced to click on Review and Publish button as shown in the picture below.&#x20;

<figure><img src="https://3137140735-files.gitbook.io/~/files/v0/b/gitbook-x-prod.appspot.com/o/spaces%2FZcl3T6ePz95GpzjAeOLW%2Fuploads%2FsfQCK2llyZL8hZNYIWJT%2Fhubspot_workflow.png?alt=media&#x26;token=2c42bbda-f480-4dc8-b4ef-61ced22cfb3e" alt=""><figcaption></figcaption></figure>

***You did it!! Now as per the trigger you have selected, the WhatsApp Message will be shared with your customers.***&#x20;
