# WebEngage WhatsApp Campaigns
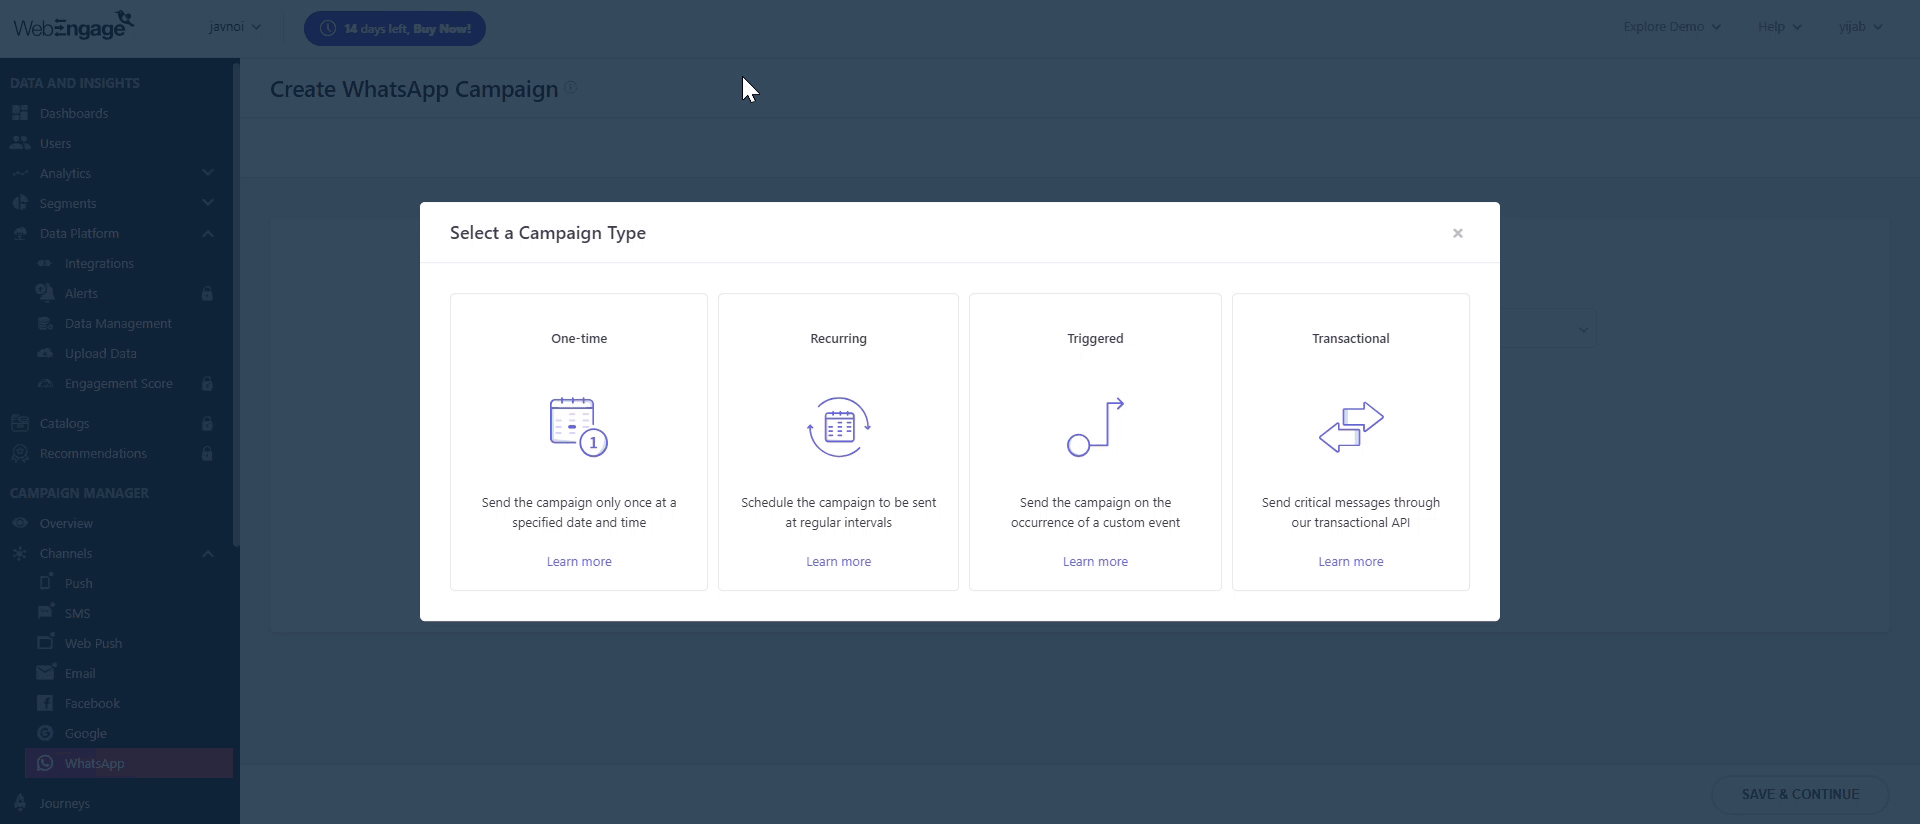
1. To create WhatsApp Campaigns in WebEngage, go to **Channels** under **Campaign Manager** and select **WhatsApp**. In the List of Campaigns window, click on **Create Campaign**. You'll be prompted to select the type of campaign: One-Time, Recurring, Triggered, or Transactional.
[*Learn more about the Campaign types in WebEngage.*](https://knowledgebase.webengage.com/docs/campaigns)
2. Choose your desired Campaign type; for this example, we'll use a **One-time** Campaign. The screen will then proceed to the next step to add the **audience** for the Campaign. To add the audience, you have to add the: **Campaign Name, Campaign Tags, Campaign Type,** and **Audience Type**:
Click on ***Save & Continue*** Button at the bottom right of the screen to move forward to adding "**When to Send**".
5. This Step of Campaign is divided into two sections:
* [Campaign Type & Schedule](https://knowledgebase.webengage.com/docs/creating-whatsapp-campaigns#campaign-schedule)
* [Frequency Capping, Throttling & DND](https://knowledgebase.webengage.com/docs/creating-whatsapp-campaigns#frequency-capping-dnd--throttling)
Click on ***Save & Continue*** Button at the bottom right of the screen to move forward to adding "**Message**".
6. Once you click, a pop-up will be there and you have to select the WhatsApp Template you want to share among the ones added on your WebEngage Account. After selecting the message template, you have to add the Sample Values for the variables defined. Click on ***Save & Continue*** Button at the bottom right of the screen to move forward to turn On "**Conversion Tracking**".
{% hint style="info" %}
If you are using a carousal template, make sure to add KEY-VALUE PAIRS. \
The format:
*For 1st card 1st button:* card\_0\_button\_0\
\&#xNAN;*For 1st card 2nd button:* card\_0\_button\_1\
\&#xNAN;*For 1st card header name:* card\_0\_header\_name\
\&#xNAN;*For 1st card header URL:* card\_0\_header\_url
If you have 3 cards and 2 buttons on each card (Call us, or visit website) then, KEY-VALUE PAIRS would be:
card\_0\_button\_0: Call us
card\_0\_button\_1: Visit Website
card\_1\_button\_0: Call us
card\_1\_button\_1: Visit Website
card\_2\_button\_0: Call us
card\_2\_button\_1: Visit Website
{% endhint %}
7. This part of campaign creation allows you to measure the effectiveness of your campaign by:
* Tracking conversions for a specific goal.
* Comparing performance against a control group.
* Testing multiple variations of the message to identify a winning version.
By default, *Conversion Tracking* is disabled for all *WhatsApp campaigns.* As shown below, you can use the toggle switch to enable it.
Click on ***Save & Continue*** Button at the bottom right of the screen to move forward to "**Test Campaign**".
8. See how your *WhatsApp message* will appear to your customers by testing it with internal team members for maximum impact!
Click on ***Skip Test & Proceed*** Button after Testing at the bottom right of the screen to move forward to "**Preview & Launch**".
9. Once you are satisfied with the test results, it's time to send the message to your users! But before that, we recommend that you conduct a quick preview of the campaign's message and settings to ensure that it's in line with your end goal.
10. Once you Launch the Campaign, you can see the status under the List of Campaigns as shown in the below picture.